In our previous blog post we shared why it is a good idea to upload your videos directly to social media sites rather than just sharing a link to the video on YouTube. In this post we’ll explain step by step how to upload and share your videos on Facebook.
Step 1: Log in and navigate to your company’s Facebook page, then click on the “Videos” tab below your cover photo.

Step 2: Scroll down to the “All Videos” section and click on “Add Video” in the top right corner.

Step 3: Find and select the video file you want to upload and click “Open”.
While the video is uploading, you can add a comment about the video, give your video a title, choose keywords, and add it to a playlist.
Under the “Thumbnail” tab on the right, you can choose a thumbnail image for your video. You can choose one of Facebook’s auto-generated thumbnail images, upload your own custom image, or select any frame from the video.
Under the “Subtitles & Captions” tab you can upload an SRT file for closed captioning. Facebook does not do automatic captioning so you will need to upload your own SRT caption file if you want closed captioning to be available on your video.

Step 4: Once your video has finished uploading, and you’ve gone through all of your settings, click the blue “Next” button in the lower right corner. You can choose to publish your video to Facebook now or at a later date, and choose where on Facebook your video should appear.
You can also choose to post the video to your any of your other Facebook pages at the same time, and add a donate button to raise money for a nonprofit organization.

Step 5: Click the blue “Publish” or “Schedule” button in the lower right corner, to publish your video now, or schedule your video to post at the time you selected.
Your video is now uploaded to Facebook! Your post will show up on your timeline and the video will also appear in “Videos” tab on your page.
Need help producing videos for your company, or help with managing videos you have already produced? Contact us today to get a free quote on your video project!
Subscribe to email updates from our blog to get notified about our next blog post where we’ll show you how to organize your Facebook videos into playlists.
RELATED BLOG POSTS
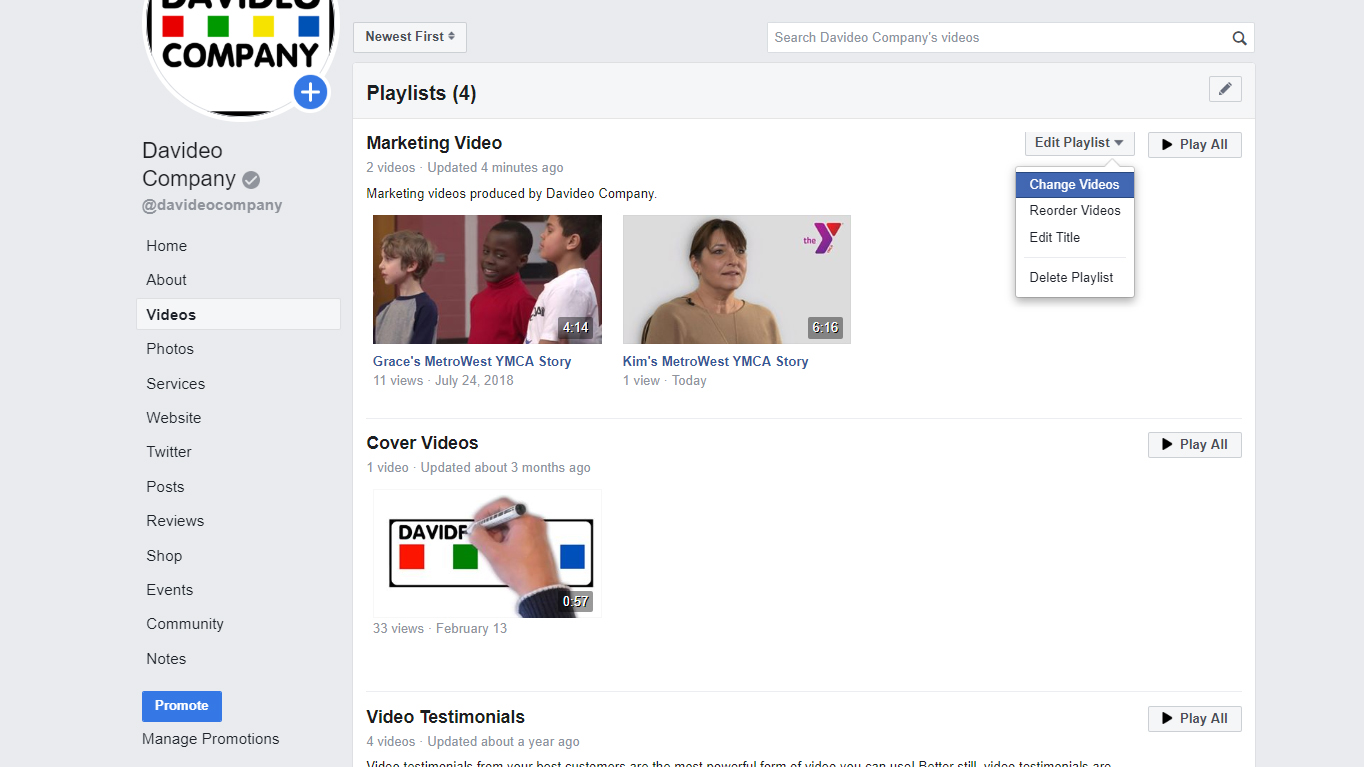
How to Create Playlists to Organize Your Videos on Facebook
YouTube’s default setting is to leave privacy-enhanced mode off. This allows them to place a tracking cookie on any computer that a viewer uses to visit your webpage. A cookie is a small file sent from a website and stored on the user’s computer by their web browser. These files hold data such as the name of the site being viewed, what pages were visited, what products or other content were viewed, etc. Read More
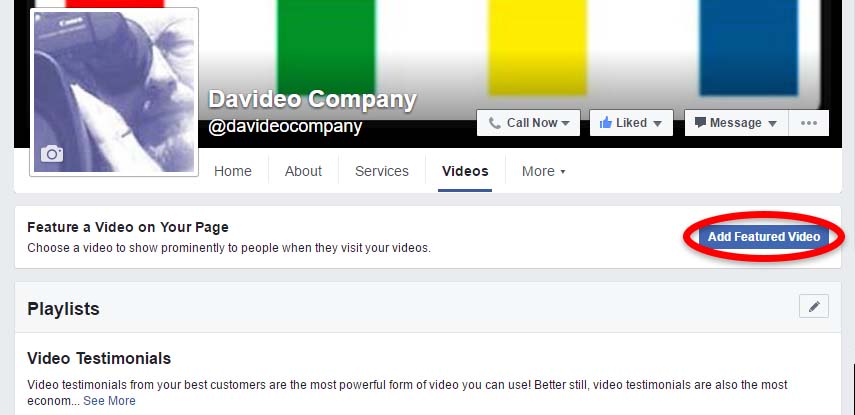
How to Add a Featured Video on Facebook
YouTube’s default setting is to leave privacy-enhanced mode off. This allows them to place a tracking cookie on any computer that a viewer uses to visit your webpage. A cookie is a small file sent from a website and stored on the user’s computer by their web browser. These files hold data such as the name of the site being viewed, what pages were visited, what products or other content were viewed, etc. Read More
If you have watched any videos on YouTube, you’ve probably noticed that when the video you are watching ends, either a screen will come up with a bunch of “related video” thumbnails, or a “related video” will just automatically start playing after ten seconds unless you click cancel. The problem with this is that some of the videos that YouTube thinks are related to yours could be from one of your competitors, or they may not be related at all. Read More


